Ready to unlock the secrets of isometric circles step by step with ease? Understanding the fundamentals of ellipses is key to creating convincing isometric drawings. Many artists find platforms like Procreate incredibly useful for mastering this skill. In fact, perspective drawing and isometric circle step by step is a crucial part of an artist’s foundation, making you able to create great arts, such as the famous Escher’s impossible constructions. Get ready to create astonishing drawings by learning how to draw an isometric circle step by step!
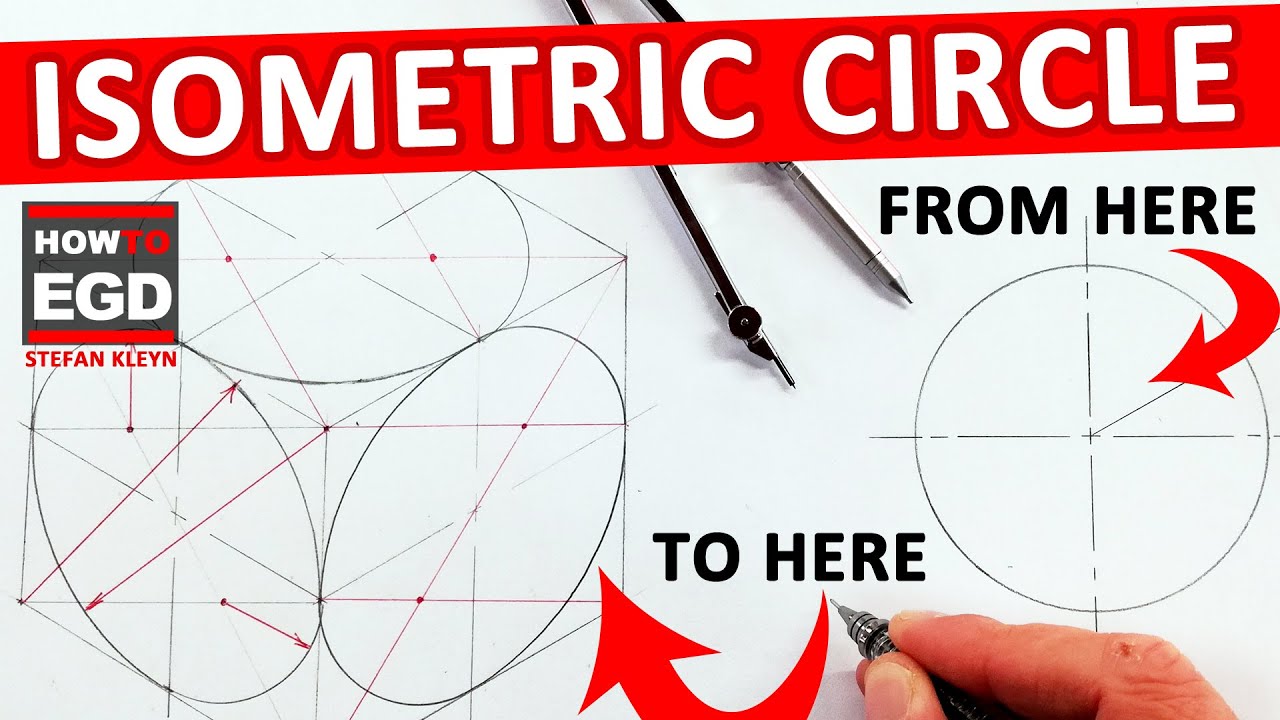
Image taken from the YouTube channel HowToEGD , from the video titled UNBELIEVABLE: EASIEST way to draw an ISOMETRIC CIRCLE!! .
Unlocking 3D Art with Isometric Circles
Imagine being able to bring your ideas to life, not just on paper, but with the illusion of depth and dimension. 3D drawing, even in its simplest forms, opens up a world of possibilities. It allows you to visualize concepts, design objects, and create captivating artwork that leaps off the page.
One of the most accessible entry points into this exciting realm is through isometric projection. But what exactly is it?
Isometric projection is a method of visually representing three-dimensional objects in two dimensions. It’s a type of parallel projection, meaning that the lines projecting from the object to the drawing surface are parallel to each other. This results in a view where all three axes (width, height, and depth) are equally foreshortened.
This technique is widely used in technical drawings, architectural plans, and even video game art. Its appeal lies in its simplicity and clarity, providing a relatively easy way to communicate spatial information.
The Power of Isometric Circles
At the heart of many isometric drawings lies a seemingly simple element: the isometric circle. However, mastering this element is key to unlocking more complex designs.
Unlike regular circles, isometric circles appear as ellipses due to the viewing angle. This transformation is crucial to understand.
The ability to accurately draw these ellipses is essential for representing cylindrical or spherical objects in your isometric creations. It allows you to create realistic and believable 3D forms.
This guide is designed to provide you with an easy-to-follow, step-by-step approach to mastering the art of drawing isometric circles. Whether you’re a beginner or an experienced artist looking to refine your skills, we’ll break down the process into manageable steps. We’ll equip you with the knowledge and techniques you need to confidently incorporate isometric circles into your artwork.
Our objective is simple: to empower you to create stunning 3D drawings with ease and precision. So, grab your pencils, and let’s begin!
Understanding Isometric Projection: The Foundation
Before we dive into the practical steps of drawing isometric circles, it’s crucial to solidify our understanding of the underlying principles. This section lays the groundwork, explaining what isometric projection is and why circles transform into ellipses. This theoretical base will ensure your isometric drawings are not just aesthetically pleasing, but also fundamentally sound.
What is Isometric Projection?
At its core, isometric projection is a method of representing three-dimensional objects on a two-dimensional plane. Imagine holding a cube and tilting it just so. That’s somewhat analogous to what isometric projection achieves.
Instead of relying on perspective, where objects appear smaller as they recede into the distance, isometric projection maintains parallel lines. This means that all three axes – width, height, and depth – are represented with equal visual weight and foreshortening (specifically, foreshortened to approximately 82% of their true length).
Purpose and Benefits
But why use isometric projection? Its primary purpose is to create clear, measurable representations of objects. This is especially valuable in fields like:
- Engineering.
- Architecture.
- Technical illustration.
The ability to take accurate measurements directly from the drawing makes it an invaluable tool.
Furthermore, its relative simplicity compared to perspective drawing makes it an accessible starting point for those new to 3D representation. Isometric drawings offer a clean and easily understood visual language. This clear visual language is preferred for technical drawings.
The Circle-to-Ellipse Illusion
Now, let’s tackle the core concept behind isometric circles. In reality, circles don’t actually become ellipses. Instead, it’s the way we perceive them in the isometric view that creates the illusion.
Think of it this way: When you view a circle head-on, all points on the circle are equidistant from your eye. However, when that circle is oriented at an angle, as it is in isometric projection, the points are no longer equidistant.
This difference in distance causes the circle to appear flattened along one axis, resulting in the oval shape we recognize as an ellipse.
The Importance of Understanding Transformation
This transformation is not arbitrary. The ellipse’s proportions are directly related to the angle of the isometric projection (which is 30 degrees from the horizontal).
Understanding this relationship is paramount. It ensures your isometric circles don’t look "squashed" or distorted. An accurate understanding allows you to create believable and consistent 3D representations.
By grasping this fundamental concept, you’ll be well-equipped to translate circular forms into their isometric equivalents with confidence and precision. This is more than just knowing how to draw an ellipse. It’s about understanding why it looks the way it does.
Gathering Your Tools: The Essential Arsenal
Understanding the principles of isometric projection is vital, but theoretical knowledge alone won’t get you there. Before you can truly master the art of drawing isometric circles, you need to assemble the right tools. Think of them as your personal arsenal, each carefully chosen to contribute to accuracy and precision.
Let’s explore the essential items you’ll need:
Tools Checklist
A workman is only as good as his tools. This old saying rings true when it comes to creating accurate isometric drawings. Ensure your toolbox is well-stocked with the following essentials:
-
Compass: The cornerstone of isometric circle creation. A compass is essential for drawing smooth, accurate ellipses. Look for a compass with a smooth, precise adjustment mechanism and the ability to hold its setting firmly. A bow compass is ideal. The precision of your ellipses will directly impact the believability of your 3D representations.
-
Ruler: For establishing straight lines and performing accurate measurements. A good ruler is non-negotiable. It should be at least 12 inches long and clearly marked with both inches and millimeters. Consider a transparent ruler for better visibility. Accuracy in your measurements forms the foundation of your isometric construction.
-
Isometric Grid Paper: A beginner’s best friend! This specialized paper features a pre-printed grid of lines angled at 30 degrees, aligning perfectly with the isometric axes. Using isometric grid paper significantly simplifies the process of creating isometric squares and circles, especially when you are first learning. While optional, it’s strongly recommended for anyone starting out.
-
Pencils (Different Grades): Don’t underestimate the power of a good pencil! Invest in a set of pencils with varying grades (e.g., 2H, HB, 2B). Harder pencils (2H) are perfect for light sketching and construction lines. Medium pencils (HB) are great for general drawing, and softer pencils (2B) can be used to add depth and definition to your final lines.
-
Eraser: Mistakes happen. A high-quality eraser is indispensable for correcting errors and cleaning up your drawing. A kneaded eraser is excellent for lifting graphite without damaging the paper, while a plastic or rubber eraser can be used for more aggressive corrections.
-
Technical Drawing Tools (Optional): As you become more proficient, you might want to explore specialized technical drawing tools such as:
-
Adjustable Triangles: For drawing precise angles.
-
French Curves: For creating smooth, complex curves beyond simple ellipses.
-
Circle Templates: Useful for quickly drawing circles of various sizes, although accuracy in isometric drawing still requires careful ellipse construction.
-
The Importance of Quality
While it may be tempting to cut corners and use whatever tools are readily available, investing in quality tools will ultimately save you time and frustration. Precise instruments lead to precise drawings. Poor-quality tools can introduce inaccuracies, leading to distorted results and a diminished learning experience.
Step-by-Step Guide: Drawing Your First Isometric Circle
With your tools at the ready, it’s time to put theory into practice and embark on the journey of drawing your first isometric circle. This step-by-step guide will walk you through each stage, ensuring clarity and accuracy in your execution. Remember, patience and precision are your allies in this endeavor.
Step 1: Constructing the Isometric Square
The foundation of your isometric circle is the isometric square. This isn’t a true square in the conventional sense, but a rhombus that represents a square viewed in isometric projection.
Using a Ruler and Plain Paper:
- Begin by drawing a horizontal line. This will serve as your baseline.
- Using your ruler, draw a line at a 30-degree angle from one end of your baseline.
- From the same starting point on the baseline, draw another line at a 30-degree angle, but in the opposite direction. These two lines form the base of your isometric square.
- Decide on the side length of your square (e.g., 2 inches or 5 centimeters). Measure this length along both 30-degree lines and mark the endpoints.
- From each of these endpoints, draw another line, again at a 30-degree angle, parallel to the opposite side. These lines should intersect, completing the isometric square.
Leveraging Isometric Grid Paper:
Isometric grid paper simplifies this process dramatically.
Simply count out the desired number of grid units along the pre-printed 30-degree lines to define the sides of your isometric square. Then, connect the endpoints to complete the rhombus.
Accuracy is Paramount:
Accurate angles and measurements are crucial. If the isometric square is not constructed precisely, your resulting ellipse will be distorted. Double-check your measurements and angles before proceeding to the next step. A slight error here will be amplified later.
Step 2: Locating the Center Point
Finding the exact center of your isometric square is essential for properly positioning the ellipse. The most reliable method is to draw diagonals from opposite corners of the square.
The point where these diagonals intersect is the center.
Precision Matters:
Ensure the diagonals are drawn accurately and that their intersection point is clearly marked. This center point will serve as the anchor for your compass when drawing the ellipse.
Step 3: Drawing the Ellipse
Now comes the heart of the process: drawing the ellipse. This requires careful compass work and a steady hand.
-
Identify the Midpoints: Find the midpoint of each side of the isometric square. These midpoints are critical for accurately placing the ellipse.
-
Establish Compass Points: Place the compass point on one of the corners of the square. Extend the compass lead to the midpoint of the opposite side. Draw an arc that extends from one adjacent side to the other.
-
Repeat: Repeat this process for the remaining corners, ensuring you’re always extending the compass to the midpoint of the opposite side, not the adjacent one. You should now have four intersecting arcs within the isometric square.
-
Connect the Arcs: Carefully connect the arcs to form a smooth, continuous ellipse. This step may require some practice and minor adjustments. Aim for a shape that appears balanced and symmetrical within the isometric square.
Tips for Avoiding Common Mistakes:
- Compass Stability: Ensure your compass is stable and doesn’t slip during the drawing process.
- Smooth Motion: Use a smooth, continuous motion when drawing the arcs. Avoid jerky movements or stops and starts.
- Light Pressure: Apply light pressure to the compass to avoid tearing the paper or creating overly dark lines.
Step 4: Refining Your Circle
Once you’ve drawn the initial ellipse, take a step back and assess its appearance. Refine the shape to ensure it fits perfectly within the isometric square.
- Adjustments: Make small adjustments to the arcs as needed to create a smoother, more balanced ellipse.
- Line Weight: Use different pencil grades to add depth and definition. A heavier line weight on the visible portions of the ellipse can enhance the 3D effect.
- Erase Guidelines: Carefully erase any unnecessary guidelines or construction lines, leaving only the final, refined ellipse.
By following these steps with care and attention, you’ll successfully draw your first isometric circle. Remember, practice is key to mastering this skill. Don’t be discouraged by initial imperfections. With each attempt, you’ll refine your technique and improve your results.
Advanced Techniques: Elevating Your Skills
Now that you’ve mastered the fundamental steps of drawing an isometric circle, it’s time to explore advanced techniques that will enhance your accuracy, efficiency, and overall ability to incorporate these circles into complex 3D drawings.
These methods will transform your isometric circles from simple shapes into powerful elements of your artistic expression.
Diameter and Radius for Precision
While constructing an isometric square provides a visual framework, knowing the precise diameter or radius of the intended circle offers another avenue for creating accurate ellipses. This method is particularly useful when replicating existing designs or working with specific dimensions.
Instead of approximating the ellipse within a square, you use the known diameter to define the major and minor axes of the ellipse directly. Remember, in isometric projection, a circle’s diameter parallel to the viewing plane remains true, while the diameter perpendicular to the plane is foreshortened.
Applying Known Dimensions
If you know the diameter, divide it in half to find the radius.
This radius dictates the size of your isometric "square," within which the ellipse will reside.
The longer axis of the ellipse (the major axis) will equal the diameter of the true circle.
The shorter axis (the minor axis) will be approximately 0.577 times the diameter (or roughly 58% of the diameter).
Using these precise measurements, you can set your compass to create an isometric ellipse with remarkable accuracy.
For example, if you need to draw an isometric representation of a pipe with a 4-inch diameter, your isometric "square" would have sides representing 4 inches. The major axis of your ellipse would also be 4 inches, while the minor axis would be approximately 2.3 inches (4 x 0.577).
This technique is invaluable in technical drawings where precision is paramount.
Integrating Circles into Complex Drawings
Drawing a single isometric circle is a great starting point, but the real power lies in integrating them into more complex 3D representations.
Imagine drawing a cylindrical object, a pipe network, or even a futuristic cityscape filled with curved structures. Mastering the placement and interaction of isometric circles is essential for bringing these visions to life.
Layering and Alignment
One of the keys to success is understanding how to layer multiple isometric shapes accurately. Consider the z-axis (depth) as well as the x and y axes when positioning your circles.
Always start with a clear understanding of the overall form you’re trying to create.
Break down complex objects into simpler, geometric components. This makes it easier to manage the drawing process.
Pay close attention to the alignment of different elements. Use guidelines and construction lines to ensure that your isometric circles and other shapes connect seamlessly.
Examples and Applications
Think about a bolt and nut assembly. Both the bolt head and the nut involve hexagonal shapes that intersect with circular forms represented as isometric ellipses.
Properly aligning and layering these ellipses is crucial for creating a realistic and understandable representation.
Another common application is drawing pipes and tubes.
Representing curved pipes accurately requires the ability to draw multiple isometric circles along a defined path, creating the illusion of a smooth, three-dimensional bend.
Remember to maintain consistent line weights and shading to enhance the depth and clarity of your complex isometric drawings.
Using Isometric Circles in 3D Modeling
While this guide focuses on hand-drawing techniques, the principles of isometric circles extend directly to 3D modeling software. Many CAD (Computer-Aided Design) programs offer tools for creating isometric projections and ellipses.
Understanding the underlying geometry of isometric circles will significantly enhance your ability to create accurate and visually appealing 3D models. You’ll be able to troubleshoot perspective issues more effectively.
Leveraging Drafting Tools
For those seeking the highest degree of accuracy and efficiency, professional drafting tools offer a distinct advantage. While not strictly necessary for learning the basics, they can streamline the process and elevate the quality of your isometric drawings.
Ellipse Templates
Ellipse templates are pre-cut stencils containing a variety of ellipse sizes, specifically designed for different isometric angles.
These templates eliminate the need for compass work in many cases, allowing you to quickly and accurately trace ellipses onto your drawing.
Adjustable Triangles and Protractors
Adjustable triangles and protractors are invaluable for creating precise isometric angles.
They ensure that your isometric squares and other construction lines are perfectly aligned, which is critical for accurate ellipse placement.
Investing in quality drafting tools can save you time and frustration, especially when working on complex or highly detailed isometric drawings.
Understanding Angles in Isometric Projection
A deeper understanding of the angles involved in isometric projection is crucial for mastering the representation of circles as ellipses.
While the term "isometric" suggests equal measure, it’s important to remember that the viewing angle foreshortens the circles along one axis.
In isometric projection, the three principal axes are equally foreshortened, resulting in angles of 120 degrees between them. However, the angles within the isometric "square" you construct are not 90 degrees. They are 60 and 120 degrees.
This distortion is what causes circles to appear as ellipses, and it’s essential to grasp this concept for accurate representation.
By understanding the relationship between these angles and the dimensions of your isometric circles, you can create drawings that are both visually appealing and technically accurate.
While mastering the techniques for creating accurate isometric circles will significantly improve your drawings, encountering challenges along the way is inevitable. Let’s equip you with the knowledge to diagnose and correct the most common pitfalls in drawing isometric circles.
Troubleshooting: Common Mistakes and How to Fix Them
Even with careful measurements and a steady hand, isometric circles can sometimes appear distorted. Understanding the root causes of these distortions is key to achieving a polished, professional look. We’ll focus on two frequent issues: proportion problems resulting in a "squashed" circle and unsteady lines caused by poor compass control.
The "Squashed" Circle: Proportionality
One of the most common issues with isometric circles is an ellipse that looks either too compressed or too elongated. This typically indicates a problem with the proportionality of your ellipse, meaning the relationship between its major and minor axes is incorrect.
Diagnosing Proportional Issues
The first step is to carefully examine your drawing. Does the ellipse seem unnaturally flat, or does it appear overly tall and thin? Compare your ellipse to correctly drawn isometric circles. This comparative analysis will help you identify the specific type of distortion you’re dealing with.
Correcting Proportionality
The key to fixing a squashed circle lies in adjusting the length of the ellipse’s major and minor axes. Remember, the minor axis should be approximately 58% of the major axis.
If your ellipse is too squashed, increase the length of the minor axis. Conversely, if your ellipse is too elongated, decrease the length of the minor axis.
Adjusting your compass settings accordingly will bring your ellipse closer to the ideal proportions. Also, double-check that you’ve drawn your initial isometric square accurately. Errors in the square will inevitably translate into distortions in the ellipse.
Achieving a Balanced Shape
Aim for an ellipse where the curves flow smoothly and naturally into the corners of the isometric square. Avoid sharp angles or abrupt transitions, which can make the ellipse look unnatural. Practice drawing several ellipses with slight variations in the axis lengths until you develop an eye for balanced proportions.
Wobbly Lines: Compass Control
Another common frustration is creating smooth, even lines for your isometric circles. Wobbly or uneven lines can detract from the overall quality of your drawing, making the ellipse appear amateurish. The culprit is usually insufficient compass control.
Improving Compass Control
The compass is your primary tool for creating consistent, flowing lines. Proper technique is essential.
First, ensure your compass is in good working order. The hinge should be tight enough to maintain its setting, but not so tight that it’s difficult to adjust.
Second, use a sharp compass lead. A dull lead will produce thick, uneven lines that are difficult to control.
Third, hold the compass properly. Place one hand lightly on the center pin to anchor it and use your other hand to gently rotate the compass arm.
Maintaining a Steady Hand
The key to drawing smooth lines is a steady, controlled motion. Avoid jerky or hesitant movements. Practice drawing continuous, overlapping lines to build your muscle memory and improve your hand control.
Avoid pressing down too hard on the compass, as this can cause the center pin to slip. Instead, apply gentle, consistent pressure as you rotate the compass. Rotate the paper, not your body. Keeping your body still makes it easier to maintain a steady hand.
Other Helpful Tips
-
Practice Regularly: Consistent practice is the most effective way to improve your compass control and develop a feel for drawing smooth curves.
-
Use Quality Paper: High-quality paper will provide a smoother surface for your compass to glide across, resulting in cleaner lines.
-
Take Breaks: If you find yourself struggling to maintain a steady hand, take a break and return to your drawing later. Fatigue can significantly impact your control.
By identifying and addressing these common issues, you’ll be well on your way to mastering the art of drawing accurate, aesthetically pleasing isometric circles.
FAQs: Mastering Isometric Circles
These FAQs address common questions about drawing isometric circles, as outlined in our step-by-step guide.
What exactly is an isometric circle?
An isometric circle is an ellipse that represents a true circle when viewed in an isometric projection. It’s not a perfect circle because isometric projection distorts the shape to create a 3D effect. Mastering drawing an isometric circle step by step is key to accurate isometric drawings.
Why are isometric circles always drawn as ellipses?
Isometric projection displays three axes equally. When you rotate a circle into this isometric view, it appears squashed, resulting in an ellipse. That’s why learning to draw an isometric circle step by step involves creating an ellipse within an isometric square.
What’s the hardest part about drawing an isometric circle step by step?
Many beginners struggle with making the ellipse smooth and consistent. It’s easy to accidentally create pointy or uneven curves. Practice and patience are key to mastering the technique and drawing a consistent isometric circle step by step.
How do I know if my isometric circle looks correct?
A well-drawn isometric circle should appear balanced within its isometric square. The long axis of the ellipse should align with the diagonal of the isometric square. If it looks lopsided or stretched in the wrong direction, it needs adjustment. Keep practicing the isometric circle step by step instructions and you will get there.
So, you’ve learned to draw an isometric circle step by step! Pretty cool, right? Now go forth, create, and remember to practice! You’ve got this!