Topography, the study of land surfaces, finds practical expression in contour maps. These maps, essential tools in fields ranging from civil engineering to environmental science, visually represent the three-dimensional terrain in two dimensions. Understanding the process of creating these maps can seem daunting, but it is actually accessible with the right knowledge and tools. GIS software, such as QGIS, significantly simplifies the task, providing powerful features for data analysis and map generation. This article illuminates how to draw contour map effectively, enabling you to create professional-quality representations of landforms, irrespective of whether or not they are near places like Mount Everest.
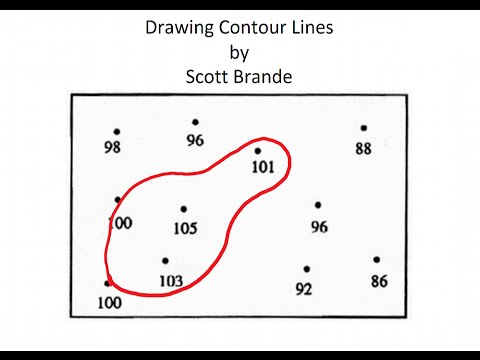
Image taken from the YouTube channel Scott Brande , from the video titled How to Draw Contour Lines on a Map .
Unveiling the Secrets of Contour Maps: A Visual Guide to Terrain
Contour maps are powerful tools that translate the three-dimensional world onto a two-dimensional surface. They provide a visual representation of terrain, showcasing elevation changes through a series of lines. Each line connects points of equal elevation, allowing us to quickly grasp the shape and features of a landscape.
But what exactly does a contour map do?
At their core, contour maps serve as a blueprint of the earth’s surface, translating complex topographical data into an easily digestible format. This functionality is essential for a diverse range of applications.
The Ubiquitous Nature of Contour Maps
Contour maps are not confined to the realm of cartographers and geographers.
They play a crucial role in numerous fields, impacting our lives in ways we may not realize.
-
Geography: Contour maps are foundational for understanding landforms, watersheds, and geographical patterns.
-
Urban Planning: They inform decisions about infrastructure placement, building design, and land use management, minimizing environmental impact and maximizing efficiency.
-
Hiking and Outdoor Recreation: Hikers and backpackers rely on contour maps to navigate trails, assess the difficulty of routes, and identify potential hazards.
-
Environmental Science: Contour maps are used to model water flow, analyze soil erosion, and assess the impact of climate change on landscapes.
The versatility of contour maps extends far beyond these examples, demonstrating their importance in a multitude of disciplines.
Accessible Knowledge: Mastering the Art of Contour Mapping
Despite their complexity, the fundamental principles of contour mapping are surprisingly accessible. You don’t need to be a seasoned cartographer to understand and create your own contour maps.
With the right guidance and a little practice, you can unlock the secrets of these fascinating visual tools.
This guide will demystify the process, providing you with the knowledge and skills to create professional-looking contour maps quickly and easily. We will explore both traditional techniques and modern digital methods, empowering you to choose the approach that best suits your needs and resources.
Whether you’re a student, a professional, or simply an enthusiast, this is your gateway to mastering the art of contour mapping.
Decoding the Landscape: Essential Contour Map Concepts
Before diving into the creation process, it’s crucial to understand the language of contour maps. These maps rely on a few core concepts that, once grasped, unlock a wealth of information about the terrain they represent. This section will lay the groundwork, ensuring a solid foundation for your contour mapping journey.
Understanding Elevation
Elevation is the vertical distance of a point above a reference surface, typically mean sea level. It’s the foundation upon which contour maps are built.
On a contour map, elevation isn’t represented by numbers scattered across the surface. Instead, it’s conveyed through the strategic use of contour lines, each representing a specific, constant elevation. Understanding how these lines depict elevation is paramount.
The Power of Contour Lines
Contour lines are the heart of a contour map. Each line connects points of equal elevation, forming a continuous loop or extending to the edge of the map.
Imagine slicing a hill horizontally at regular intervals; each slice would create a shape that, when projected onto a flat surface, becomes a contour line.
These lines are not random squiggles; they adhere to a set of fundamental rules:
-
Contour lines never cross each other, except in the rare case of an overhanging cliff or cave. If they did, it would imply that a single point has two different elevations, which is physically impossible.
-
Closely spaced contour lines indicate a steep slope, while widely spaced lines suggest a gentle slope. This is perhaps the most important visual cue on a contour map.
-
Contour lines form closed loops, although these loops may not always be visible within the map’s boundaries.
-
Contour lines that cross a stream or river form a "V" shape, with the point of the "V" pointing upstream. This indicates the direction of water flow.
Contour Interval: Defining Detail
The contour interval is the vertical distance between adjacent contour lines. It represents the difference in elevation between each successive line on the map.
The contour interval directly influences the level of detail a map can display. A smaller contour interval (e.g., 5 feet or 1 meter) provides a more detailed representation of the terrain. It’s capable of capturing subtle elevation changes.
Conversely, a larger contour interval (e.g., 50 feet or 20 meters) simplifies the map, highlighting major landforms but obscuring finer details.
The choice of contour interval depends on the terrain’s characteristics and the map’s intended purpose. Flat or gently sloping areas often benefit from smaller intervals to reveal subtle undulations. Mountainous or rugged terrain may require larger intervals to avoid a cluttered and unreadable map.
Topography: Painting the Terrain Picture
Topography refers to the shape and features of the land surface. Contour lines are the primary tool for representing topography on a map.
By carefully analyzing the patterns formed by contour lines, we can visualize the terrain in three dimensions. Closely spaced lines indicate steep cliffs or ridges, while widely spaced lines suggest gentle slopes or flat areas. Concentric closed loops indicate hills or mountains, with the highest elevation at the center. Depressions, like valleys or sinkholes, are also represented by closed loops, often with hachure marks (short lines pointing inward) to distinguish them from hills.
Understanding how contour lines collectively represent topography is key to interpreting any contour map. It allows us to "read" the landscape and extract valuable information about its form and features.
From Paper to Pixels: Methods for Creating Contour Maps
Having grasped the fundamental principles that govern contour maps, the next step is to explore the various methods used to bring these representations to life. Creating contour maps can range from traditional, hands-on techniques to leveraging the power of modern digital tools. The choice of method depends on the desired accuracy, available resources, and the scale of the project.
Manual Drawing Techniques: The Art of Cartography
Before the advent of computers, all contour maps were created by hand. This method, while time-consuming, offers a direct connection to the data and a deep understanding of the terrain.
A Step-by-Step Guide to Manual Creation
The manual method begins with surveyed data points. These points represent locations where the elevation has been accurately measured. These surveyed data points are usually collected using surveying equipment like theodolites or GPS devices.
-
Plotting Data Points: The first step is to carefully plot these points on a base map, ensuring accurate placement based on their coordinates.
-
Determining the Contour Interval: Decide on an appropriate contour interval based on the terrain and the map’s purpose.
-
Interpolation Between Points: This is where the art comes in. You’ll need to estimate the location of contour lines between the known data points. This estimation, called interpolation, is guided by the principle that slopes are generally consistent between nearby points.
-
Drawing Contour Lines: Connect the interpolated points of equal elevation with smooth, flowing lines. Use a light pencil initially, then refine the lines as needed.
-
Labeling and Annotation: Clearly label each contour line with its elevation value. Add any other relevant annotations, such as landmarks or geographical features.
Tips for Accuracy and Neatness
- Use a sharp pencil and a good eraser.
- Work systematically, starting with a low contour interval.
- Double-check your work frequently.
- Maintain consistent line weight for clarity.
Essential Tools and Materials
- Base map
- Surveyed data points
- Pencils (various hardnesses)
- Eraser
- Ruler or scale
- French curves (optional, for smoother lines)
- Compass (for drawing circular features)
Geographic Information Systems (GIS): Digital Cartography
Geographic Information Systems (GIS) have revolutionized contour map creation. GIS software provides powerful tools for visualizing, analyzing, and manipulating spatial data, making the process significantly faster and more accurate than manual methods.
GIS Software Options
Several GIS software options are available, each with its strengths and weaknesses.
- QGIS: A free and open-source GIS software. QGIS is a robust option suitable for a wide range of mapping tasks.
- ArcGIS: A commercial GIS software suite that provides comprehensive tools for geospatial analysis and mapping. It is considered an industry standard.
- Surfer: Specifically designed for creating contour maps and 3D surface models from scattered data points.
Advantages of Using GIS
-
Speed: GIS software can automatically generate contour maps from large datasets in a fraction of the time it would take manually.
-
Accuracy: Digital methods reduce the risk of human error, leading to more accurate contour representations.
-
Automated Analysis: GIS allows you to perform various spatial analyses on your contour maps, such as slope calculations and terrain profiling.
Digital Elevation Models (DEMs): The Data Source
At the heart of GIS-based contour mapping lies the Digital Elevation Model (DEM). A DEM is a raster data set representing the elevation of the earth’s surface at regularly spaced intervals. Essentially, it is a grid of elevation values.
Understanding DEM Data
Think of a DEM as a digital photograph where each pixel’s color corresponds to an elevation value. The finer the resolution of the DEM (i.e., the smaller the pixel size), the more detailed the resulting contour map.
Obtaining DEM Data
-
Government Agencies: Many government agencies, such as the USGS (United States Geological Survey), provide free DEM data for various regions.
-
Online Repositories: Numerous online repositories offer DEM data, often derived from satellite imagery or airborne surveys.
Interpolation: Filling in the Gaps
Regardless of whether you’re drawing by hand or using GIS software, interpolation plays a vital role in creating contour maps. Interpolation is the process of estimating elevation values at locations where data is not directly available. This is crucial because surveyed data points or DEM grids are rarely dense enough to capture every nuance of the terrain.
Interpolation Methods
Several interpolation methods exist, each with its own assumptions and limitations.
-
Linear Interpolation: Assumes that the elevation changes linearly between known data points. Simple but may not be accurate in complex terrain.
-
Spline Interpolation: Creates a smooth, curved surface that passes through the known data points. Often produces visually appealing results.
The choice of interpolation method depends on the characteristics of the terrain and the desired level of accuracy. GIS software typically offers a range of interpolation options, allowing you to experiment and select the method that best suits your needs.
Having explored the methods of creating contour maps, from traditional hand-drawn techniques to harnessing the power of GIS software, it’s time to focus on refining those maps. Accuracy is paramount, but a well-crafted contour map should also be visually compelling and readily understandable. The following tips will help you elevate your maps from functional to exceptional.
Elevate Your Maps: Pro Tips for Stunning Contour Representations
Creating effective contour maps involves more than just plotting data and drawing lines. It requires a nuanced understanding of cartographic principles and a keen eye for detail. The aim is to produce a map that is not only accurate but also easily interpretable and visually appealing.
Understanding and Applying Scale
Scale is a fundamental concept in cartography. It dictates the relationship between the distance on the map and the corresponding distance on the ground.
A large-scale map (e.g., 1:1,000) shows a small area with a high level of detail, while a small-scale map (e.g., 1:100,000) displays a large area with less detail.
Choosing the appropriate scale is crucial as it directly impacts the amount of information you can effectively represent. A scale that is too small will lead to congested contour lines and loss of detail. Conversely, a scale that is too large may result in an unnecessarily large and unwieldy map.
Interpreting Gradient from Contour Lines
The spacing between contour lines provides a visual representation of the terrain’s gradient or steepness. This is a critical element in understanding the landscape depicted on the map.
Closely spaced contour lines indicate a steep slope, meaning the elevation changes rapidly over a short distance. This might represent a cliff face or a particularly sharp rise in terrain.
Conversely, widely spaced contour lines suggest a gentle slope, where the elevation changes gradually. These areas are often characterized by rolling hills or relatively flat plains.
Understanding this relationship allows map readers to quickly assess the overall ruggedness or gentleness of the terrain.
Selecting the Right Contour Interval
The contour interval, the vertical distance between adjacent contour lines, significantly affects the map’s clarity and the level of detail it conveys. The selection of an appropriate interval is highly dependent on the terrain’s characteristics and the map’s purpose.
In areas with relatively flat terrain, a smaller contour interval (e.g., 1 meter) is necessary to capture subtle changes in elevation. Using a larger interval would result in a map with very few contour lines, failing to adequately represent the landscape.
For mountainous or rugged terrain, a larger contour interval (e.g., 20 meters or more) might be more appropriate. A smaller interval in such areas would lead to an overwhelming number of closely spaced contour lines, making the map difficult to read and interpret. The goal is to strike a balance between detail and clarity.
Enhancing Clarity Through Labeling and Annotation
Labeling and annotation are essential for enhancing the usability and interpretability of your contour maps. Clearly labeling contour lines with their corresponding elevation values is crucial. This allows map readers to quickly and easily determine the height of various points on the map.
In addition to elevation labels, consider annotating other relevant features, such as peaks, valleys, rivers, and roads.
Use clear, concise labels and a legible font. The font size should be large enough to be easily read without being overly intrusive. Avoid cluttering the map with too many labels. Prioritize essential information and strategically place labels to maximize readability.
Contour Maps Made Easy: FAQs
Here are some frequently asked questions about creating contour maps quickly and easily, using the techniques described in this article.
What exactly is a contour map?
A contour map is a type of map that uses contour lines to represent elevation. Each contour line connects points of equal elevation, allowing you to visualize the terrain’s shape and steepness. These maps are essential in fields like surveying, geology, and urban planning.
How is this different from other methods to draw contour maps?
Traditional methods can be time-consuming and require specialized software. This article focuses on simplified, faster techniques suitable for sketching and preliminary visualizations. You can quickly learn how to draw contour maps with these methods, especially for situations where precision isn’t paramount.
What kind of data do I need to start drawing a contour map?
You’ll ideally need elevation data, which can come from survey points, topographic maps, or even estimated measurements. The more accurate your elevation data, the more accurate your final contour map will be. It’s still possible to learn how to draw contour maps even with rough estimates, getting better with practice.
Can I use these techniques for large areas?
While these methods are great for smaller areas and quick sketches, creating highly accurate contour maps for very large areas would benefit from using digital elevation models (DEMs) and GIS software. However, the fundamental principles of how to draw contour maps remain the same.
So, feeling confident about how to draw contour map now? Awesome! Go out there and create some amazing maps. Don’t be afraid to experiment and have fun with it!