Optimal radiographic evaluation of the calcaneus hinges on precise axial calcaneus x ray positioning. The American College of Radiology (ACR) guidelines emphasize standardized techniques for lower extremity imaging, highlighting the importance of proper patient positioning to visualize subtle fractures or pathologies. Accurate calcaneal fracture assessment benefits significantly from mastering the axial calcaneus x ray positioning, aiding clinicians in diagnosis and treatment planning.
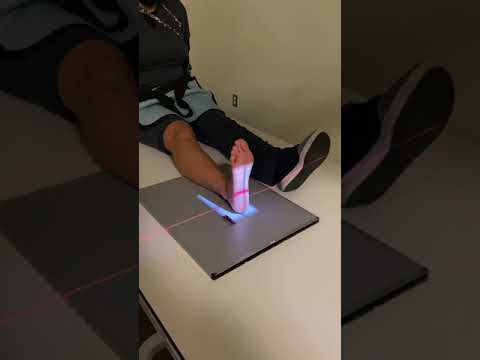
Image taken from the YouTube channel XrayImagingLady , from the video titled Calcaneus X-ray Positioning .
Achieving Optimal Axial Calcaneus X-Ray Positioning: A Step-by-Step Guide
This guide provides a detailed explanation of how to achieve accurate and consistent axial calcaneus x ray positioning. Achieving optimal positioning is crucial for accurate diagnosis and avoiding the need for repeat exposures.
Understanding the Importance of Correct Positioning
Proper axial calcaneus x ray positioning is paramount for the following reasons:
- Accurate Visualization: It allows for clear visualization of the calcaneus (heel bone), particularly the subtalar joint and any fractures, bone spurs, or other abnormalities.
- Reduced Distortion: Correct positioning minimizes distortion and magnification, enabling accurate assessment of the bone’s size, shape, and relationship to surrounding structures.
- Diagnostic Confidence: A well-positioned image contributes to a higher degree of confidence in the radiologist’s interpretation and diagnosis.
- Minimizing Retakes: Consistent and accurate technique reduces the necessity for repeat exposures, lowering the patient’s radiation dose.
Patient Preparation and Communication
Patient Explanation
Before commencing the procedure, thoroughly explain the process to the patient. This helps alleviate anxiety and ensures their cooperation. Include:
- The purpose of the X-ray.
- The required position they will need to maintain.
- The importance of remaining still during the exposure.
- Any potential discomfort they might experience.
Removal of Artifacts
Ensure the patient removes any items that could interfere with the image:
- Shoes and socks.
- Jewelry around the ankle or foot.
- Any metal objects in the pockets of their trousers that may interfere with the lower limb.
Equipment and Setup
Necessary Equipment
- X-ray machine with appropriate collimation.
- Image receptor (either film-screen cassette or digital detector).
- Positioning sponges or wedges for support.
- Lead apron for patient protection.
Standard Technical Factors
These are general guidelines, always adjust as needed based on patient size and department protocols:
| Parameter | Value |
|---|---|
| kVp | 60-70 kVp |
| mAs | 5-10 mAs |
| Focal Spot | Small |
| SID (Source-Image Distance) | 40 inches (100 cm) |
| Collimation | To area of interest |
Positioning Technique: The Axial Calcaneal View
This section provides a detailed, step-by-step guide to achieving correct axial calcaneus x ray positioning.
-
Patient Position: Have the patient seated or lying supine on the x-ray table. The leg being examined should be extended.
-
Leg and Foot Positioning:
- Dorsiflex the foot, pulling the toes towards the shin as much as comfortably possible. This is crucial for opening up the calcaneus.
- Ensure the plantar surface of the foot is as perpendicular as possible to the image receptor. Use a positioning sponge or wedge under the foot to maintain this position.
-
Beam Centering:
- Center the X-ray beam perpendicular to the long axis of the foot.
- The central ray should enter the plantar surface of the foot approximately 1 inch (2.5 cm) distal to the ankle joint.
-
Collimation: Collimate to the area of interest, including the entire calcaneus and surrounding soft tissues.
-
Shielding: Provide appropriate lead shielding to protect the patient’s gonads.
-
Exposure: Instruct the patient to remain still and suspend respiration during the exposure.
Evaluating the Radiograph for Proper Positioning
After the exposure, carefully assess the radiograph to ensure optimal axial calcaneus x ray positioning has been achieved. Key indicators of a well-positioned image include:
- Visualization of the Calcaneus: The entire calcaneus should be clearly visualized, from its posterior aspect to its anterior process.
- Subtalar Joint Visualization: The subtalar joint (the articulation between the talus and calcaneus) should be open and well-defined.
- Lack of Rotation: The medial and lateral borders of the calcaneus should be approximately equal in length, indicating no significant rotation.
- Absence of Superimposition: There should be minimal superimposition of the talus on the calcaneus.
- Appropriate Density and Contrast: The bone should be well-penetrated, allowing for visualization of trabecular patterns.
Axial Calcaneus X-Ray Positioning: FAQs
Here are some frequently asked questions regarding axial calcaneus x-ray positioning and achieving optimal imaging results.
What is the purpose of an axial calcaneus x-ray?
An axial calcaneus x-ray primarily evaluates the calcaneus (heel bone) for fractures, dislocations, or other abnormalities. Proper axial calcaneus x ray positioning ensures a clear visualization of the bone’s structure.
Why is accurate positioning so crucial for an axial calcaneus x-ray?
Precise axial calcaneus x ray positioning is vital to avoid distortion and overlap of surrounding structures. This accuracy allows for optimal assessment of the calcaneus and precise diagnosis of potential issues.
What are the key landmarks to consider during axial calcaneus x-ray positioning?
Key landmarks include ensuring the plantar surface is perpendicular to the image receptor and that the central ray is angled appropriately, often around 40 degrees cephalad. Careful attention to these points ensures correct axial calcaneus x ray positioning.
What can go wrong if the axial calcaneus x-ray positioning is incorrect?
Poor positioning can lead to misdiagnosis, requiring repeat imaging and increased radiation exposure for the patient. Inaccurate axial calcaneus x ray positioning can obscure fractures or simulate other pathologies.
Alright, that wraps things up! Hopefully, you’re feeling more confident about nailing that axial calcaneus x ray positioning. Go out there and practice, and remember, even the pros started somewhere!